![]()
![]()
![]()
![]()
|
|
|
|
|
>>> View: Logger Control [Start Logger]
>>> Ctrl L [Start Logger]
>>> ![]() [Start Logger]
[Start Logger]
The Start Logger tab is used to start, stop or restart a logger.
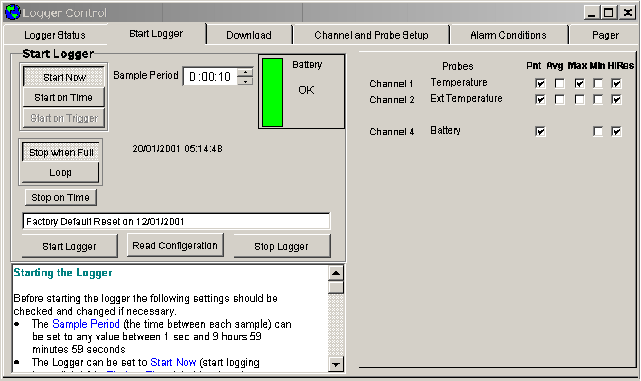
Battery Status
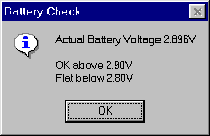
The Battery Status indicator shows the current state of the loggers internal battery. It will indicate that the battery is OK (green) , Marginal (yellow) or requires Replacement (red).

You can check the Actual Battery Voltage by clicking on the colored area of the Battery Status indicator. This will give you a Battery Check Window.
Sample Period
The Sample Period (the time between each sample) can be set to any value between 1 sec and 9 hours 59 minutes 59 seconds
![]()
Start Now
The Logger will start logging data as soon as the logger is started
Start on Time
When Start on Time has been selected a Time to Start control will appear allowing you to enter the Date and Time for the Logger to start logging.
![]()
Start on Trigger
The logger starts in the future when triggered by the use
Start on Condition
The logger starts in the future when a user defined condition occurs. First select the channel to be monitored and then enter the value and condition that will start the logging. When the monitored channel meets the condition the logger will start. In the example below logging will start when the internal temperature rises above 20°C. If the temperature is already above 20°C the logger will start immediately
![]()
Stop when Full
The logger will stop logging data when the memory is full. This is the default setting.
Loop
The logger will continue logging data even when the memory is full. The new data will over write the oldest data. This is not available on all loggers.
Stop on Time
If Stop on Time has been selected a Time to Stop control will appear allowing you to enter the Date and Time for the Logger to stop logging. This option is not available on all loggers.
![]()
User Area
A 60 character Logger Identification field is provided for you to enter any text that you may want to use to identify the logger.
![]()
Probes setup in start logger screen
The available logger channels are displayed on the right of the Start Logger page
If available you can use this area to select
When the box is ticked that information will be logged. If no boxes are ticked for a probe then no data will be logged for that probe.
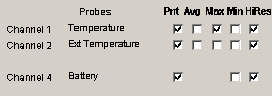
Low Resolution always save data in 8bit mode. Some of the High resolution loggers allow you to save data in 8bit or 16bit mode (saving in 8 bit mode will increase the number of readings the logger can hold). When this option is available Ticking the HiRes box will save data in 16bit High resolution mode. Not Ticking the box will save data in 8bit Low Resolution mode.
Channel 1 Incremental Smoothing
This is used to setup the smoothing when a divice such as a wind vane is connected to Channel 1, the first analog input.
Timer 1 Average Time
Timer 1 average time is in seconds. Used mainly when a wind speed unit is connected to the timer 1 counter input. If set to 0 then the pulses coming from the wind speed unit are counted until the value is logged and then they are reset to 0. If > 0 then the pulses are counted until the Timer 1 average time in seconds has elapsed then the counter is stored and reset. The stored value is what is logged.
Averaging Sub Interval
Averaging sub interval is in seconds. This is the period of time between reading of the probes when averaging, maximum and minimum are calculated. If set to 1 second then the averaging is done on a 1 second period.